Friday, July 31, 2009

CHICKEN FEET

Is it a severed baby's hand? No! It's a delicious chicken foot! These are very popular in China. I saw them all over, at just about every restaurant we went to. I refused to eat one, or even touch one for that matter, and the only way they could get me to taste it was to trick me.

Be sure to click and enlarge this picture to see all the disgusting detail.

One particular day when I wasn't suspecting anything, they gave me a battered, deep-fried thing all clumped together into an indistinguishable shape. When I asked what it was, they said "chicken" and they stayed calm and low-key to avoid bringing attention to it.

I nibbled at it and found it was mostly skin and not too much meat. They kept watching me as I nibbled at it which made me distrustful. Sometimes they would giggle too. Eventually I ate enough of it away to see little white human-like knuckles and I knew instantly I'd been duped. Then everyone laughed at me. The end.

Thursday, July 30, 2009

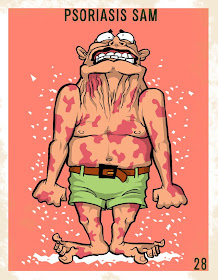
PUKEY PALS: Check List and Rick R. Mortis

Here's a check list for all the cards...


...and the last straggler card. Now I'd like to do a large illustration with more detail than these cards allow me for a puzzle on the backs of the cards.

Wednesday, July 29, 2009

PUKEY PALS: Lester Leper

I wonder if it's possible to use leprosy to rot off unwanted stomach fat. It would be great if they could contain it into one area, and then kill it off when it had done its job.

Tuesday, July 28, 2009

Monday, July 27, 2009

PUKEY PALS: Flipperstein and Deady Bear

I'm reusing an earlier idea, Flipperstein. I redrew him prettier with more wrinkles and shadows. I wrote the title and card number twice so it worked either way. That was extra work so I should get paid double! Double nothin'! I'll know if they cheat me because double-nothing weighs more.


I wondered if maybe it would have been better to show his stuffings pouring out instead of red blood. In the end I felt the stuffings weren't pukey enough.

Saturday, July 25, 2009

PUKEY PALS: Potty Mouth and Sweet Matilda

Brad suggested a monster with a mouth like a urinal. Ta-Da!

I imagine if I had to stand near Sweet Matilda, I'd hear deep, guttural mouth-breathing, even when she wasn't winded or tired.

Friday, July 24, 2009

PUKEY PALS: Ebola and Fiend

It's funny to me to think a guy with only minutes to live would go ahead and go bowling anyway.


This drawing started out as a mean baby and I was very happy with it. I was curious how he'd look with a hat and fang and since I was using a pencil I figured after I found out, I'd erase it all since I already considered him to be finished. Then the ears got pointy and he grew a mustache. Eventually he wasn't a baby anymore.

It was now time to erase the paraphernalia, but the eraser was ALLLLLL the way on the other end of the pencil. I figured it was too much trouble to change him back, so laziness won out. Laziness decided he would no longer be a baby.

Wednesday, July 22, 2009

PUKEY PALS: D. D. Dean and the McSneakies

For those who are just now seeing this disgusting mess, I'm inspired by Nutty Mads and Weird-Ohs and that sort of stuff from the 60s. My goal is to make a 55 card set. When I get them all done, I'd like to have them printed hopefully with a big poster-sized puzzle on their back faces.

Monday, July 20, 2009

PUKEY PALS: puking and a pachyderm


I almost feel like I cheated on this one. It didn't take as much time or ink.

Sunday, July 19, 2009

PUKEY PALS: Snobbery and Putting on Hairs

The more of these I make, the less proud I become of myself.


Finally! A non-gross one!

Saturday, July 18, 2009

PUKEY PALS: Fatty Mattie and Electric Eric

My mom taught me a poem when I was little:
Fatty Mattie, Two by four
Couldn't get through the kitchen door
I never understood the two by four part. Two-by-fours are 2 inches by 4 inches. That's not big. Just yesterday I googled the poem and found the real version.
Fatty, Fatty, two by four,
Couldn't get through the bathroom door,
So she did it on the floor,
Licked it up and did some more
Yikes! It still doesn't clear up the Two-by-Four part. I was saddened to learn it's Fatty Fatty, and not Fatty Mattie. Anyway, this is what I've always imagined Fatty Mattie looking like.


When I was a kid, I touched both the + and the - prongs of a 9-volt battery to my tongue. The sensation was quite unpleasant. As miserable as it was on my tongue, I know it would be even worse on an eye.

Thursday, July 16, 2009

Wednesday, July 15, 2009

Tuesday, July 14, 2009

PUKEY PALS: un-mustache and ear food

This one actually makes me a little nauseous. I don't know why it's worse than any of the others to me, but it is. I couldn't decide which name was better.


And this one is inspired by a person I know.

Friday, July 10, 2009

HOMEMADE BOMB MOVIE PROP

I'm wanting to make a small movie about a mean robot alien who comes to Earth. I've been building several props for this movie. Earlier I posted the robot and a gun I made. I still need a few more items like a miniature version of the robot and a UFO. This particular item is a retro-style bomb for dropping out of an airplane. It doesn't really explode but I think I can do that with video editing and sound effects. When the button on the top is pushed, it acts like an unstable bomb ready to blow at any second with warning lights and beeping to signify danger.

Here's what the bomb might look like in action.

These are the things I used to make the bomb. A large funnel, a waste basket with fins (it came that way from Target,) old broken electronics boards pulled from a radio, clear plastic trading card boxes, some electronic parts such as blinking LEDs, battery pack, a buzzer, an ON/OFF push button and some wire. I got the electronic parts from Radio Shack for about $10.

I soldered all the positive ends of the LEDs and the buzzer to the positive end of the battery pack. I soldered the negative ends to the on/off button, and soldered the other end of the button to the negative end of the battery pack. These LEDs will blink on their own. They also make non-blinking LEDs but I didn't think they would be as exciting.

On a bandsaw I cut out just enough of a radio electronics board to fit inside a trading card box. These electronics won't do anything other than just sit there and look electronicky. I remember on the Six Million Dollar Man tv show, when they would roll back the fake skin on his arm, it would look like this.

To make a hole to receive the electronic trading card box, I pencilled off where I wanted it to go, and drilled as many holes as I could along the inside of the pencil mark.

Then I used a chisel to finish off the smooth edge of the hole. There are probably better ways to do this, but my arsenal of tools is limited.

I used some of that 2-part epoxy putty to mount the ON/OFF button into the funnel spout. Before I epoxied it in there, I roughed up the funnel spout's surface with coarse sand paper to give the epoxy something to grab onto.

While the epoxy was still soft (you have about 15 minutes) I smoothed out the top surface the best I could. This was the largest button they had at Radio Shack. I would have liked it to be bigger. Someday I'd like to expoxy a larger wooden knob onto this button to make it bigger.

I made a hinged and latched door way on the back side of the body to change out batteries when necessary. The wooden block will be screwed and epoxied behind the door, inside the body as a containment area for the batteries. That way they won't slop around all over the insides of the bomb when it's jostled. Also I used the back side of this wooden block as a place to mount the beeping gizmo.

I cut circular holes and mounted small caps inside the holes to make cup-shaped recesses. I put labels with "WARNING - CRITICAL" and "LIVE" in the recesses. I drilled a hole in the center, and mounted an LED inside each one, and put them behind clear plastic windows.

Here's a size comparison next to a weiner dog.

I hade a total of 4 LEDs so I mounted the other 2 inside the trading card box faux-electronics. The funnel and the base were screwed together with pan-head screws. The trading card boxes were mounted with epoxy putty. I had extra screws so I put them around the body to give it a riveted look.

This is after I painted it. Here's the battery door in action. The 4 screws you see around the door are holding the wooden block in place.

The paint I used is Krylon "brown metallic hammered." It looks like old iron. It's made specifically for plastic. Normal spray paint will eventually flake off as the plastic ages. Before I painted it, I sanded it to give the paint some tooth. TA-DA! It's done!
Watch this video to see it work.