Sunday, May 31, 2009

STUFFED BAT


I got this taxidermy bat when I went to Thailand last Summer. I thought it was the greatest thing in the world when I saw it, and it was only about $3 or $4 dollars American money. I bet it was even cheaper than that, but since I was a tourist I got the high price. It's fairly large too; it's got a 13" wingspan. He's got red glass eyes which give him a seriously creepy expression. It says "HAIRLESS BAT" but he's got a pretty hairy body.

Mei was okay with me buying it. She said it would look very nice in my TV room. Translation: It ain't going in the living room.

I was worried I wouldn't get him onto the plane because they give you a card to fill out, and it asks if you are bringing any food, soil, or animals into the country. I talked with someone and they said at this point it's no more an animal than my leather belt and I'd be okay. I was surprised the window of the glass box wasn't shattered with the way luggage guys fling suitcases.

I bought it pretty early on in my vacation, and after I bought the thing, it consumed my every thought. I worried the entire trip I was gonna break it or lose it, or it would be stolen. Mei would periodically comfort me and tell me nothing would happen to it, but I felt like something was bound to happen. Usually when I like something that much, fate will destroy it. Amazingly though it did make it home.

Here's an unfinished bat drawing:

Saturday, May 30, 2009

DARRYL WAS AN OCTOCLOPS


Back in school when Darryl wore glasses all the kids would laugh and chant, "16-Eyes, 16-Eyes! Ha ha!"

Friday, May 29, 2009

HERB'S HORRIBLE MEXICAN VACATION

This is a fake children's book cover. Parents probably wouldn't want their kids learning how to bull fight from a book with bad grammar errors.  
ENLARGE

Thursday, May 28, 2009

HAND CARVING


I made this specifically to hold those finger puppets. Some of the puppets stood on their own, but some had arms hanging lower than their waistline, so they had to lie on their backs. It can also be used to hold rings and bracelets.

I'm left-handed so I used my right hand as a model when I carved this wooden hand. I glued the thumb on as a separate piece of wood. That way I was able to roughly saw out all the fingers and palm curve without worrying about cutting through the thumb.

Wednesday, May 27, 2009

BIG BOY AND HIS SHAMEFUL ARM

I scanned my Big Boy bank and then rotated his hamburger-lifting arm back down into normal at-rest position with my computer. Look at it! It's disgusting and freakish! I didn't add anything to it. I just rotated it at the shoulder, and again at the elbow, and that's what happened. What kind of nuclear radiation is that burger emitting?
 

Tuesday, May 26, 2009

FLIPPERSTEIN (upside down face guy)

This is an animated GIF but I guess in order to see it move you gotta save it to your computer and open it in a web browser. For some reason it just sits and doesn't do anything in my blog. It's not a big deal since in the animated version he only rotates.

I've made upside down face drawings like this before, but I was more happy with this one than the others since every line was actually meaningful in both directions. Usually in these drawings, there are some parts the viewer just has to ignore, like nostrils and teeth on the forehead. I wish I could figure out a way to put neck bolts in it but if I did, then he'd also have to have temple bolts.

Monday, May 25, 2009

CROWS painting


This was going to be a fairy tale style children's story involving crows, potatoes, an old castle, and a scared kid. This is as far as I got. The crows keep coming back for more potatoes until the kid has no more. The crows give the kid three days before they come back. The kid must figure out how to satisfy the crows' potato demands or she can never leave the castle's prison tower. Being locked up in a castle makes it very difficult to produce potatoes, so the kid must think up an ingenious plan.

Kind of like in the Escape Hatch painting I posted a while back, this painting has 2 light sources: one being the moon, and the other coming from the opposite direction inside the room.

The stoney walls were fun to paint. After doing the overall base color, I drew stone or brick lines in with the shadow color. When that dried I used the highlight color and hit the edges facing the light. 

Saturday, May 23, 2009

COW!


This cow stares at you while you try to look at the pretty farm scenery until you feel uncomfortable about it all and walk away.

QUESTOR THE ROBOT

Meet Questor. His name comes from the word I remember seeing stamped onto Tinkertoys when I was a kid. I never knew what it meant but it sounded robotic. My original plan was to make a robot I could use as a character in a movie. It's still the plan but so far no movie.

He's about 40" tall, made from stuff I found at the dollar store or in my junk drawer, all held together with screws and super-glue. I think the hummingbird feeder head is the most important part. If you wanna be inspired to make a robot, go to Lowes or Home Depot or Walmart and look at the hummingbird feeders. They have all kinds of shapes and sizes, and every single one of them looks like a robot head. Some have flowers around the bases; those would be good for girl robots.

If you look at Questor's back (2 images up) you can see a top-hinged trap door disguised as a rocket pack. When you reach inside the trap door, you can control his mouth, turn his head, and move his arms up and down, like a ventriloquist dummy. I figured that was would be enough live control I needed, and the rest, like laserblasts and flying could be edited in with the computer.

His shoulders, elbows, hips, knees and ankles all move too, but to control those I'd need to use strings, or make sure my hands are out of frame when I move him.

To make his brain, i got a styrofoam ball and mounted it onto a stick. I spray-painted it black so it wouldn't be as noticeable, and then I stuck about a pound of radio parts into the styrofoam ball until every inch of it was covered.


Phony movie poster, starring my niece and nephew.

Wednesday, May 20, 2009

PHOTO MANIPULATIN'

Everyone's always asking me, "Hey Keith, how can I make it look like I've peeled the skin off my face?"

Just open up the scanner and lean the side of your face over it, and as the scanner moves, roll your head to the opposite side.


ENLARGE or it won't work
Here's a homemade stereogram picture. I had 2 pictures of my head, each slightly different. After taking the 1st picture, I moved the camera 3 or 4 inches to the side and took the second picture. When I put the 2 pictures side-by-side I had to test them to see which one belonged on the left and which on the right.

There are red dots over the centers of each of the pictures. If you can stand it, cross your eyes enough for the 2 dots to overlap, and my face will pop out in horrifying 3D.


This thing was just laying in the driveway!

Tuesday, May 19, 2009

PENCIL PORTRAITS


I've been doing these for extra moola. I charge $60 PER FACE and size isn't really a factor (other than available paper sizes). Actually I prefer larger, since I don't need to do a lot of finicky, eye and hand straining details. A group of faces is still $60 per face even if they are all on the same piece of paper.  

I prefer working from photos rather than live models since I don't have to worry about them wiggling around. Also their expressions change from happy to angry as they see how their portrait is coming, so their face becomes a mixture of joyous, tearful, frightened and furious emotions.

Babies and pretty people are very difficult to draw since they don't have distinguishing wrinkles, warts, sores, or missing teeth I can exploit. I love drawing ugly people for this reason. In light of this, I've made a new special offer. Ugly people are cheaper since their likenesses are easier to capture. I am the judge of whether or not you are ugly, so you can't claim yer ugly just to get a better deal! I'm on to you cheapskates! HA!


Those last 2 guys got one of those special deals I was talking about.

Monday, May 18, 2009

PALINDROME NAMES

Kind of a palindrome but not really. Not exactly an ambigram either, I guess, since it doesn't work upside down. I made this name to look the same when viewed in a mirror. Is there a word for something like this?

It was for my friend whose name is Robert Canada II. In a mirror is says Robert Canada II, see?

This is my own name "Keith." This one is an ambigram since it works upside down. I like this one because it looks the same 4 different ways: Straight on, upside down, in a mirror, and upside down in a mirror. It's like a 4-piece pie with a center point. I still can't figure out a good way to do my last name "Seifert" but I haven't given up.
I've made lots of these for my friends and family. I think I like these because I like symmetrical stuff.

When I was around 6 or 7 years old, I didn't want to wear a baseball cap because it only had a bill on one side. I was almost okay with a Sherlock Holmes hat since it had 2 bills, but what would have been the ultimate perfect hat would have been one with 4 bills pointing in the north-south-east-west directions. I remember approving of the Gilligan hat.

Here is "Nash," "Wells," and "Kevin."


Sunday, May 17, 2009

X VS. O (ZANG! painting) STEP-BY-STEP

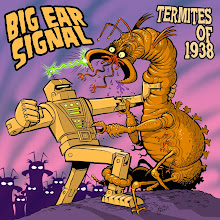
First  I applied a bead of dark blue paint to the top half of the canvas, and a lighter blue to the bottom half. I blended them by wiping the canvas back and forth with a large brush, starting at the top, and working my way down. When I got to the bottom, I reversed and went from bottom to top. I repeated these steps until I got a smooth gradient. I let this dry.


Then I painted all the base colors and let those dry. 


I thinned down some purple and created a wash. I brushed all the shadow areas on the lower right sides of all the objects. This step is kind of like shading something with a pencil. The more coats of purple wash I applied, the darker it became. I let that dry. I used a hair dryer to speed up the drying time.


This step was fairly subtle and maybe even unnecessary. At the time, I didn't feel there was enough of a gradient in the bean-shaped bodies, so I found a green lighter than the base color, and thinned it with water. I brushed the left halves of the two bean shaped bodies and let that dry.


I watered down some yellow to create a wash for the highlights on the upper left sides of the objects. Same as the shadow wash, the more coats I applied, the less transparent and more saturated the yellow became. I dried each coat with a hair dryer before applying the next.


I needed the figures to stand out from the background so I created a secondary light-blue light source. I didn't thin this paint down. I used it straight from the tube and just hit the lower right edges of the objects.


With a thinned down orange wash I brushed on a laser blast. Also I brushed some of this wash onto the shot alien's head as if the laser glow was flashing onto him. I let that dry.


With the same orange paint, NOT THINNED, straight from the tube, and painted a thinner laser line in the middle of the previous blast line. I used this orange also to hit spots on the aliens where the shine of the laser would touch them, such as the gun itself, and the shot alien's hand, and the shooting alien's foot and fingers. I put a dot of it on the emitting ball of the gun too. I let all that dry.


I used pure white straight out of the tube to do the hottest center core of the laser flash. I put a very tiny speck of it in the center emitting ball of the gun.


Since the bulk of the painting is blue, with some leanings toward green, To make the letters stand out, I made them orange with some leanings toward red, which are the most contrasting hues on a color wheel.


I painted red outlines on the letters. Instead of using a reddish-orange, I shared out the 2 colors by having orange be the base, and red be the outlines.


The last step was to paint the stars and planets. It's easy to go overboard with this step. Some stars should be brighter than others (controlled by how much water is added to the paint.)

And that's pretty much it!

Saturday, May 16, 2009

LOUIE THE LUG


I wanna try more drawings like this. You start with a black piece of paper and only draw the highlights with a white pencil. I think I was inspired by those big thug baseball players on that old Bugs Bunny cartoon. They had giant jaws, little ears, and crooked noses, and they were bald.

Friday, May 15, 2009

FLAPPING BAT CRANK TOY


This bat was carved from mahogany. After I made his head/body section I had no idea what to do with him, and he sat for a few months. I came up with some fairly involved ideas but eventually settled on this.
His wings were so thin I couldn't think of a good way to attach the hinges. There wasn't enough wood to firmly hold screws, and the wings were curved so the hinges wouldn't lay flat on the surfaces. The only thing I could come up with was to take an Exacto knife and slice out a sliver at a time into the edge of the wing and slide the hinge inside. The wing was paper thin and a little flexy on either side of the slot, but once the hinge was in place there was no problem. Then I put dowels in the wings to pass through the hinge screw holes.
This is how the contraption works. As the wheel turns it raises and lowers the bat's support dowel. Copper wire holds the wings near the hinges. The spot the wings are held becomes an axis as the body moves up and down. 

I had to do a lot of measuring to get the wires the right length. The 1st attempts went badly because the wires were either too long or too short causing everything to lock up. It's surprising how much difference even an 1/8 of an inch will make.
Here's a video of what he looks like in action.
Related Posts with Thumbnails