Showing posts with label painting. Show all posts
Showing posts with label painting. Show all posts
Tuesday, June 21, 2011
I PAINTED A GUN
Here's a gun stock I painted. The guy who bought it loves deer hunting. If you click and enlarge the picture you'll be able to see some tiny little deer hidden in it.


Wednesday, October 6, 2010

Saturday, September 18, 2010
BATCAVE PLAQUE
Here's an easy project you can make in a day. A BATCAVE plaque! Woohoo! It looks good hanging in a work shop or den, or under the carport or out in the garage, or in the living room (if you're spouse allows it.)

First I folded a piece of paper in half and drew and cut out half-a-bat. The clunkier you make it the more Sixties-y it will look. I unfolded and traced the bat onto a scrap piece of wood, and cut it out on a band saw.

I sanded the edges a little bit and sprayed it with gloss black enamel paint.

Then I cut out a lettering mask with an Exacto blade. I had to make little triangles with masking tape for holes in the "A" and "B" letters. I was going to paint the letters white but I was out of white spray paint so I used silver. I think silver made it more snazzy, like something on the tv show. I used a regular sheet of paper since it was easy to cut. Since it was paper and it was flimsy there was some over-spray(under-spray?) under the edges of the letter openings. After I sprayed it the paint absorbed into the paper and curled it so paint was able to get in where it wasn't supposed to. When you paint it you need to be quick. As an alternative you could use something a bit thicker, like a donut box lid, or you could take the time to make little inside-out rolls of tape to hold the mask down to the wood. I was in too big of a hurry and did it the sloppy way. I kind of liked the over-sprayed look though. It seemed industrial.
The thickness isn't really important. This one measures 5/8" thick. Now all it needs is a hook on the back to hang it.

The requirements for this project are:
A piece of wood
Black enamel spray paint
White (or Silver or Yellow) enamel spray paint
A couple pieces of paper for cutting out the bat shape, and the lettering mask
Masking tape
Scissors
A pencil
a band saw
Sand paper
A hook to hang it
A desire to be awesome

First I folded a piece of paper in half and drew and cut out half-a-bat. The clunkier you make it the more Sixties-y it will look. I unfolded and traced the bat onto a scrap piece of wood, and cut it out on a band saw.

I sanded the edges a little bit and sprayed it with gloss black enamel paint.

Then I cut out a lettering mask with an Exacto blade. I had to make little triangles with masking tape for holes in the "A" and "B" letters. I was going to paint the letters white but I was out of white spray paint so I used silver. I think silver made it more snazzy, like something on the tv show.
 I used a regular sheet of paper since it was easy to cut. Since it was paper and it was flimsy there was some over-spray(under-spray?) under the edges of the letter openings. After I sprayed it the paint absorbed into the paper and curled it so paint was able to get in where it wasn't supposed to. When you paint it you need to be quick. As an alternative you could use something a bit thicker, like a donut box lid, or you could take the time to make little inside-out rolls of tape to hold the mask down to the wood. I was in too big of a hurry and did it the sloppy way. I kind of liked the over-sprayed look though. It seemed industrial.
The thickness isn't really important. This one measures 5/8" thick. Now all it needs is a hook on the back to hang it.

The requirements for this project are:
A piece of wood
Black enamel spray paint
White (or Silver or Yellow) enamel spray paint
A couple pieces of paper for cutting out the bat shape, and the lettering mask
Masking tape
Scissors
A pencil
a band saw
Sand paper
A hook to hang it
A desire to be awesome
Tuesday, April 13, 2010
DESTROYER ROBOT
This was created on the computer pretty much the same way it would be created in 3 dimensions. I drew one block first. I made a block shaded 3 different tones on 3 different sides. After that the bulk of the drawing was finished.
I copied that block and started stacking pieces together the same way I'd stack real blocks together. There are a few non-block elements but it's mostly the same block either squashed or stretched.

I copied that block and started stacking pieces together the same way I'd stack real blocks together. There are a few non-block elements but it's mostly the same block either squashed or stretched.

Tuesday, March 16, 2010
HOW TO MAKE A GUITAR-PLAYING EGGROLL part 9
This guitar-playing eggroll guy is done! Finally. See the building process for this guy in my previous posts. He is a 3D version of the 2D mascot of Wok N Roll restaurant here in Evansville, IN.
After painting him, I glued in his arms and the guitar, and clear-coated him with Krylon brand clear acrylic spray. I used satin finish rather than gloss so he didn't get a shiny glare are certain angles.

Here are some random shots.
I cobbled together some photos and made this clunky animated spin. The music was created by my brother Kevin and me.
After painting him, I glued in his arms and the guitar, and clear-coated him with Krylon brand clear acrylic spray. I used satin finish rather than gloss so he didn't get a shiny glare are certain angles.

Here are some random shots.
FRONT:

SIDE:


SIDE:

BACK:


He seems slightly stumped or thoughtful in this picture, like he's in the middle of a song but forgot the lyrics.


BACK SIDE OF NECK:


TWANG!


TOP:


MUG SHOT:
 I gave him to Jane, the lady who owns the restaurant and she seemed very happy. She's trying to think up a way to display him where he can't be broken. He looks just like a toy so it's highly likely he'll eventually get his arm(s) twisted off by kids. The goal though, is to let him keep his arms where they are.
 I gave him to Jane, the lady who owns the restaurant and she seemed very happy. She's trying to think up a way to display him where he can't be broken. He looks just like a toy so it's highly likely he'll eventually get his arm(s) twisted off by kids. The goal though, is to let him keep his arms where they are.
If anyone has any ideas as far as displaying him let me know. My 1st thought was to put him in a bubblegum machine globe. They make giant glass globes. I don't know where I'd get one but I know they exist.
I cobbled together some photos and made this clunky animated spin. The music was created by my brother Kevin and me.
Monday, March 15, 2010
HOW TO MAKE A GUITAR-PLAYING EGGROLL part 8
Today I paint the eggroll guy I made in the previous posts. I painted his body brown 1st. It took a little bit of mixing to get the same color as in the drawing but I eventually matched it.
I'm glad I didn't run out in mid-painting. I don't think I'd have ever matched the 1st batch again exactly. To make the crevasses stand out more I mixed a darker more watery brown and put it in all the cracks, like in the fold lines and under his cheeks. (insert "cracks, cheeks, dark brown" joke here.)

Here are his arms and guitar. I didn't paint the ends of the arms so the glue would hold better. Same with the pin on the back of the guitar. It may not make a big difference but I don't want the paint to make a barrier which stops glue from reaching the wood. If there are any glue expert guys out there feel free to tell me I'm nuts. I'm curious about it.

He's painted with flat acrylic paints. I used the same paints I use to do canvas paintings: 44 cent Apple Barrel brand from Walmart. I always wonder if they have the endurance of the more expensive brands, but I have paintings I made over a decade ago and they don't show any signs of fading or failing. Also they are nontoxic. Supposedly the expensive brands cause cancer if you get them under your fingernails. If you are interested in this click HERE.
I'm gonna glue his arms in and give him a clear coat and tomorrow he'll be finished.
Tuesday, January 19, 2010
"GUY GIRL GOON" signed prints available

Remember this painting? Well, now it's possible for you to...
FEEL! This guy's anger!
HEAR! This girl's shrieks!
SMELL! This goon!
It was my 1st post. That post also came with instructions for doing your very own painting just like this one, but if you are lazy like me and don't have the time, I do have prints available for sale. The print is on slick and snazzy card stock suitable for framing, and it's exactly the same size as the original, 11x14 inches, so you can get all up in its face and see its disgusting detail!
The price is $34 and the shipping is free in the USA.Each print is signed by me (unless you don't want that mucking it all up. I understand. It's already revolting enough as it is.)There's a link over on the right with a PayPal button.
(I know I post a few fake products every once in a while, but I wanted to make it clear this is not a joke. It's really real. If you doubt it just click on that button over there and see if something doesn't get delivered to your home. The reason I say this is because I've been asked in the past if those Pukey Pals trading cards were fake. They are the opposite of fake; they are really, really real.)
Tuesday, January 5, 2010
PAINTING PROJECT -part 5
(Continued from yesterday)
I used a big house painting brush and slapped it over the entire painting. Some places didn't need as much so after it dried a bit I wiped some back off with a damp paper towel to suit my eye. I like doing this because it ties everything together into a sort of color family. I liked the aqua-marine blueish green color the background became. That seems more piratey to me.
 CLICK TO ENLARGE
I gave everything a clear coat with Krylon (tm) Crystal Clear gloss acrylic spray to protect it. Clear-coating it makes the colors seem deeper and richer, very much like an oil painting.
 CLICK TO ENLARGE
I gave everything a clear coat with Krylon (tm) Crystal Clear gloss acrylic spray to protect it. Clear-coating it makes the colors seem deeper and richer, very much like an oil painting.
That's it for this job. Now I will mail him away and never see him again. It's like mailing away my child. The only difference is this child doesn't smart-mouth me or break my things, so it's even sadder to say goodbye. sniff...
Monday, January 4, 2010
PAINTING PROJECT -part 4
(Continued from yesterday)
On the color wheel, yellow is the opposite of purple. Since I used dark purple for the shadows I needed to use yellow for the highlights. I did this the same way I did the shadows. I mixed 2 parts water to 1 part LIGHT YELLOW paint to create a transparent mixture. I hit the tops and left sides of everything in the path of the light. This step goes a lot quicker than the shadow step. The strongest, most built-up mixture of LIGHT YELLOW was on the pirate's nose, the top edge of the crow's nest. I put some of this mixture between the purple ripples in the water.
To make the telescope and the shark's fin seem shiny, I put a hard-edged, non-gradiating streak of unthinned LIGHT YELLOW on the upper left edges. I let all that dry over night.

(Last step tomorrow)
Sunday, January 3, 2010
PAINTING PROJECT -part 3
(Continued from yesterday)
I mixed DARK PURPLE with water to make a transparent color for all the shadows. No matter what the base color is, it gets a purple shadow. Purple on everything! Since the shadow color is thinned with water and transparent, the base colors will show through. This makes it seem like a color other than purple on each differently colored item.
I mixed DARK PURPLE with water to make a transparent color for all the shadows. No matter what the base color is, it gets a purple shadow. Purple on everything! Since the shadow color is thinned with water and transparent, the base colors will show through. This makes it seem like a color other than purple on each differently colored item.
I used 2 drops of water for every 1 drop of paint. It's a good idea to count out the ratios in case you use up your mixture and need to mix more. You're going to want your 2nd batch to match the 1st batch. Brushing on the shadows is very much like shading something with a pencil. I layered up this shadow color as needed. The more layers I stacked up the darker it became. I kept a hair-dryer next to me so I could dry each layer of paint more quickly.

Since the light is coming from the left, I put shadows on the right sides of everything. The closer I got to the right side edge of each object the more layers were built up. I also drew some ripple lines in the water with this thin wash. Also while I was thinking about the water, I put some thinned brown in the water for the crow's nest refection, and thinned gray for the shark fin's reflection.

Since the light is coming from the left, I put shadows on the right sides of everything. The closer I got to the right side edge of each object the more layers were built up. I also drew some ripple lines in the water with this thin wash. Also while I was thinking about the water, I put some thinned brown in the water for the crow's nest refection, and thinned gray for the shark fin's reflection.
If I put too much shadow color on anything, I used a damp paper towel to wipe it back off. Since the base color was dry and cured over night it didn't wipe away. When I was satisfied with everything I let it all dry over night.
(Continued tomorrow)
(Continued tomorrow)
Saturday, January 2, 2010
PAINTING PROJECT -part 2
(Continued from yesterday)
This step was a 3-part process.
PART A - I painted in all the solid base colors. I used dark MIDNIGHT BLUE for all the black stuff like his hat and the flag. I never use black because it makes things ugly and dirty and unnatural, and it sucks all the light away like a black hole. I didn't want to paint over all the details in his face so I left just enough gaps to indicate where the wrinkles were. I let this dry. This is probably the most mindless and boring step. When this step was finished I was happy.
PART B - After I painted his crow's nest brown, I used the MIDNIGHT BLUE for the lettering on the side. Also I used that color to draw fine lines to indicate the individual planks of wood. I let that dry.
PART C - I mixed MIDNIGHT BLUE with water (about half and half) and brushed grain lines into the planks of wood. While I had this thinned dark blue mixture I feathered out his beard on the edges. I let everything dry over night.

Friday, January 1, 2010
PAINTING PROJECT -part 1
There's a a super nice (and patient) guy in Florida who asked to buy my original Pitiful Pirate painting. THIS ONE:

When I told him it was only 8" x 10" he said he wanted it double tall and double wide: 16" x 20". He also said he wasn't a stickler and I could make the new one any way I wanted. I never liked the pink background on the original so I figured I this was an opportunity to do a better version. I will make the background blue which seems like the most sensible color. I don't know what possessed me to go with pink on the original.

2. I penciled in the figures directly onto the dried paint.


When I told him it was only 8" x 10" he said he wanted it double tall and double wide: 16" x 20". He also said he wasn't a stickler and I could make the new one any way I wanted. I never liked the pink background on the original so I figured I this was an opportunity to do a better version. I will make the background blue which seems like the most sensible color. I don't know what possessed me to go with pink on the original.
The story behind this painting is: There's a pirate and he's in trouble, but he refuses to stop his evil ways even in times of need. Helping him would be like helping an alligator. It wouldn't be appreciated. As soon as you finish helping him he will strike you dead and take your valuables. I don't know if people read that into it, but that was my intention.1. The sky is made by squirting LIGHT BLUE paint at the top and an even LIGHTER BLUE paint on the bottom of the canvas. Starting at the top I made horizontal passes back and forth with the brush, working my way down to the bottom of the canvas. The paint mixed in the brush as I worked my way down. When I got to the bottom I did the same thing in reverse until I'd reached the top of the canvas. I left the paint a little streaky on purpose. Then I let that dry.

2. I penciled in the figures directly onto the dried paint.

That's enough for today. I need to let that stuff cure before I do the next step.
Tuesday, December 8, 2009
FLIP THE BIRD
I think I did this drawing more for the joke name than the character itself.
This was made with the "Liquify" tool in my photo manipulatin' program.
1st I drew an aqua-blue colored ball and shaded it with the airbrush tool.
Then I used the Liquify filter in my photo-manipulatin' program. With that you can squish and squoosh and stretch it into any shape you desire, just like clay.

Don't forget to save a copy of your original ball shape on another layer beforehand so you can add new pieces to your creation. His body was 1 piece, the feathers were separate pieces, his legs and toes were separate pieces, and his beak was a separate piece. I changed the hue of the beak to make it orange, and added nose holes, but it's mostly just a smashed up ball shape. Same for the legs, I used the Hue adjustment to change their color after I got them squeezed into the shapes I wanted.
The cheeks, head and eyeballs were all separate pieces. To make pieces blend smoothly together (like the cheeks into the head) I feathered the edges with the eraser tool so they were fuzzy.
I'll try to make a tutorial but it seems so simple and intuitive I don't know if anyone would need it. If you can squash a ball of clay then you can do this. Give it a try!
I'll try to make a tutorial but it seems so simple and intuitive I don't know if anyone would need it. If you can squash a ball of clay then you can do this. Give it a try!
Thursday, November 12, 2009
BABOON COCOONS (from the Moon)
When I'm bored I usually draw one of two things: monkeys or frankensteins. It always seems to come down to that. I guess a Frankenmonkey would be the most perfect thing I could ever draw. I don't dare draw it though because then the fantasy would be over.
Today was monkey day. I added some words so it would look like a book cover. The more distant the monkeys were, the less opaque I made them so they seemed like they were fading in the distance.

Here's a single monkey pod.

Maybe when these monkey pods hit the ground they sprout arms and legs so they're mobile, and able to make trouble.


Here's a single monkey pod.

Maybe when these monkey pods hit the ground they sprout arms and legs so they're mobile, and able to make trouble.

Friday, October 30, 2009
MINI-QUESTOR PROJECT PART 10
These are the final steps in the Mini-Questor project.
I painted his back details to match the colors of the original larger version.

I painted his front details. It's not very clear in this picture, but also I glued wires in the holes on his chest.

While that stuff dried I got some wire and bent it to match his antenna.

On the top of the antenna, I made a little ball and painted it yellow. The ball is made by rolling up some 2-part epoxy putty like the kind Billy Mays was always hawking on tv. Then I pushed it onto the wire before it cured. You have about 5 minutes and then it becomes as hard as a rock.

He's soooooooooooooooooooooooooooooooooooo close to being finished now.

I used Gorilla Glue to glue the bubblegum machine container to his neck ring. Be careful with this stuff. The container says it expands 3 - 4 times its original size and they ain't kiddin! A tiny drop the size of a sesame seed expands to the size of junebug! If I didn't know better I'd swear it was the same thing as that spray foam insulation stuff. I just held it together by hand until the glue dried. It took about 10 minutes. When you are holding something tightly 10 minutes seems more like 30.

After that dried, I drilled a little hole in his helmet and into his brain for the antenna to attach. I didn't have a small drill bit the size of the skinny wire, so I put another straight piece of that same wire into the drill and used it to drill the hole. Then I used that Gorilla Glue again to mount the antenna onto the brain and the bubble.

Tomorrow after he's good and dry I'll put his head on his body and be done with him. YAY!
Wednesday, September 16, 2009
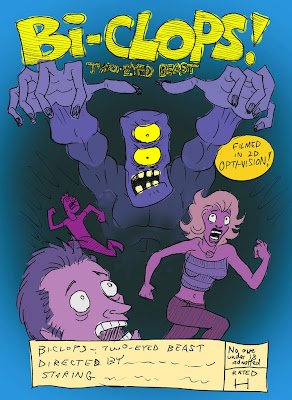
BI_CLOPS ROUGH SKETCH
Before I do a painting, I like to work out the colors ahead of time. I didn't do this in the beginning and my success rate was about 50/50. When things turned out good it was accidental. Even though it seems like double the work, it saves me lots of headaches and frustrations in the future.
This is a rough pencil sketch I scanned and quickly colored in a photo-manipulatin' program. These colors are all on different layers so I can alter the HUE, SATURATION, and BRIGHTNESS with the slider tools until find a set of colors I'm happy with.
I guess most people may already know this, but if anyone doesn't:
When I have each color on a separate layer, I can start by making everything the same color. Or I don't have to. It doesn't really matter which color I start with since they all get manipulated anyway. With those 3 sliders you can get literally any color in the world.

I guess most people may already know this, but if anyone doesn't:
HUE = which color. Red, orange, yellow, green, blue, or purple?
SATURATION = the range between gray-scale and full color
BRIGHTNESS = how dark or light
When I have each color on a separate layer, I can start by making everything the same color. Or I don't have to. It doesn't really matter which color I start with since they all get manipulated anyway. With those 3 sliders you can get literally any color in the world.
When I do the actual painting I know my paints won't be able to exactly immitate the glowingly radiant brightness of computer monitor colors, but it gets me going in the right direction. It takes out all the guess work and mistake cover-upping.
You can rarely go wrong by intentionally altering colors in an unnatural way to achieve a color scheme. Even though skin isn't purple in real life it looks better being purple for this particular color scheme. There's some deeper color scheme info HERE.
Thursday, September 10, 2009
FISH-EATING BEAR EATING FISH
I can post a step-by-step of this one later. I'm not real happy with the grass but I don't know if anyone will be looking at the grass (Although who can avoid it now that I've mentioned it.)
After I finished this painting I used a watered down amber color and brushed over the entire thing. That makes it look antique, and unifies all the colors. I've only done this trick a few times, but it improved the results of each painting I've tried it on.
If you try this wash-trick be sure to allow your original painting to dry over night first. That way if you don't like the results of amber wash, you can lightly wipe off just that layer with a damp paper towel and you won't affect the actual painting underneath.

Tuesday, September 8, 2009
SWEET and SOUR and BOOM

I invented a new weapon. Instead of a BOOMERANG, it's a called a BOMBERANG. You have to throw it and run, because when it comes back it will explode at it's point of origin. Maybe a box of bomberangs could be "accidentally" lost in enemy territory. I can think of 10 or 12 uses right off the bat. If someone is catching up to you in an important bicycle race, FLING! If you are driving on the road and notice an annoying tailgator, FLING! Approaching bear? FLING!
Well, maybe I can't think of 10 or 12 uses, but that's just right off the bat.
Sunday, August 2, 2009
PAIN(T)
I need to start using an easel. Sometimes after I've been drawing or painting for any length of time, my neck will cramp up and not stop hurting for a month or more. It's not an exaggeration to say it feels like someone hit me in the center of the neck bone with a hammer. I've been making a conscious effort not to crane my neck over my work like a vulture, but I forget over and over. It's the kind of thing that just slowly occurs without my knowlege.
 Those are 44 cent Apple Barrel paints from Walmart.
An easel helps the neck, but not the arms. When I hold my arms out with no support under my elbow, after a while my hand will get shaky. You may say, "Keith, that means you need to lift weights and strengthen your arm muscles."
I say it's because my arm muscles are just so massively huge and bulky and weighty, so it's a lot of work for me to lift them. It's logic!
A lady at work puts a tennis ball on the end of a 3 ft. stick, and uses that as a support to rest her elbow on when she paints. The tennis ball is there so the end of the stick won't scratch the painting. She just holds the stick in her other hand and locks it against her body.
Thursday, June 11, 2009
SKULL PAINTING ON MOTORCYCLE
Here's a painting I did on a friend's custom motorcycle, or tricycle; whichever you call it. I only had about 1 hour to do it. My friend was in a pretty big hurry for it, and stood over me while I painted it. I wanted to do more but he said he liked it as it was, and took off with it! And that's the last I ever saw of it.


Subscribe to:
Posts (Atom)