Monday, May 31, 2010

IMPROVEMENT???

This was an ad banner in Yahoo email.

Does it really look like an improvement in the smoothness of her skin? Looks pretty lumpy and splotchy to me. Sure it's somewhat better, but is it really worth bragging about?

Sunday, May 30, 2010

FILIPINO BATMAN AND ROBIN

ATTENTION: SPOILER ALERT!

If you plan on watching the Filipino Batman and Robin movie some time in your life, don't watch this video and see the wonderously magical ending.

Friday, May 28, 2010

ELECTRIC GUITAR PROJECT part 5

This is how I made the nut for my guitar. If you aren't familiar with guitar jargon a "nut" is like a bridge, but it goes on the top end of the strings, up by the tuning keys.

I started with a 1/4" piece of Plexiglass(tm). I found this in the trash at work. It had cuts and breaks and scratches and holes in it but I only needed a few inches of good stuff so it was fine.

1st I cut out a manageable chunk slightly bigger than what I would need.

I laid it against the fretboard to copy the fretboard arch, but I raised my pencil line up so the nut would be about 1/8" above the fretboard's surface. On an edge sander I freehand sanded to my pencil line. While I was at it I also sanded the nut to match the width of the neck.

You can't see it very well from this picture, but there is a slight angle in the top surface of the nut. That will relieve the stress on the strings. The angle tilts down toward the direction of the tuning keys.

I used a very tiny file with a triangular cross-section to file 6 evenly-spaced grooves into the top of the nut. The 2 outermost grooves are only 1/8" away from the edge of the nut. The rest are spaced about 1/4" apart.

To hold the nut onto the neck I drilled 2 little holes in the bottom. I cut the heads off 2 brads and put them in those holes.

I made matching holes in the neck. You can see them if you look closely at this photo. These holes were pretty critical. If I didn't get them right the nut could be off-center, or not flat against the fretboard. If the nut was off-center the strings would hang off the fretboard on one side. If the nut wasn't tight against the fretboard the intonation would be wrong. I checked and double checked my marks before I drilled these 2 holes. Then I wiped the sweat, crossed my fingers, and tested the fit. I uncrossed my fingers before checking the fit because it was difficult to hold everything.

Tada! It pressed on snugly and seated flat into position. Shoo! That's one of the few extremely critical steps. I'm happy it turned out okay. Right now the string grooves are intentionally a bit high. After I get the strings on it I will do some deeper filing to get the string action just how I like it.
If you look at this photo you can see the holes for the brads are at a slight angle. This is to create a pinching effect so no epoxy is needed to hold the nut in place. When it's all assembled everything is tight. If I remove the nut, the brads will become loose and fall out. That makes it handy for future replacements or for fine tuning the string action. If all the strings are high I can sand the bottom of the nut rather than filing all 6 grooves.

I sanded all the surfaces of this nut so rather than clear it's frosted. In the past, depending on the rest of the hardware, I've colored the nut black. That can be done at any time so I'll see how things look later on, and decide then.

Thursday, May 27, 2010

WIND-UP ROBOT

I just got this new robot. I know it's difficult to know the scale of it without a wiener dog in there for reference, but it's about 3" tall. It's all tin with lots of sharp edges and points, and it's really heavy. It has the potential of causing real pain if it were ever to be thrown by some mean kid.

Tuesday, May 25, 2010

GIANT FRANKENSTEIN PEZ DISPENSER

Two of my favorite things all rolled into one: Frankenstein and Pez.

I got this for $8. There are some on ebay but they cost a little more. This is what he looks like from the side.

And the front.


When you open his head, rather than releasing a single piece of candy, he dispenses an entire package of Pez. Also he lights up and groans and has various sounds which cycle through at each dispensement.

Sometimes he flashes red and sometimes green. That's just plain crazy! I'd have paid $8 even without the sounds and lights. It's above and beyond necessary but I do appreciate it.

Monday, May 24, 2010

SCREAMING ZOMBIE PENCIL DRAWING

This is a practice. You can never draw too many zombies/frankensteins/monkeys I always say.


It's sort of a more 3D-ish, less comical version of THIS old zombie drawing from my website.

Sunday, May 23, 2010

MAD MONKEY PENCIL DRAWING

I think it would be funny to do someone's portrait, and then after they've posed for it for 15 or 20 minutes, I could secretly slip this out from under the stack of paper and show it to them. He he! But then I'd probably get beat, so maybe it's not a good idea after all. Seems like Old Keith is much wiser than Young Keith used to be. Old Keith knows what things will result in pain.

This is a line drawing done with a black brush pen, and then shaded with black pencil, and highlighted with white pencil.

Saturday, May 22, 2010

Thursday, May 20, 2010

MR. PEANUT SALT AND PEPPER SHAKERS

I found these at a flea market. I've been looking for Mr. Peanut stuff for a while.

My dad didn't like us having Mr. Peanut stuff when we were kids. Now I crave it because it was forbidden for all those years. My dad never liked Mr. Peanut and said he was bad. My mom didn't understand why he hated Mr. Peanut so much and asked his mom. My grandma confessed when my dad was a very young kid back in the 1950s there was a guy dressed up in a Mr. Peanut costume handing out packages of peanuts to the kids.

My overly protective grandma told him, "He's a stranger! Don't take those peanuts!"

Being at such an impressionable age, after that he grew up thinking Mr. Peanut was some kind of evil and demented sicko.

Next to a wiener dog for size comparison.

Wednesday, May 19, 2010

Monday, May 17, 2010

THIS MONSTER WAS PRETTY POLITE

I'm sad because you can't see the hump in his (her) back from this front view photo. The hump is what really made it.

Friday, May 14, 2010

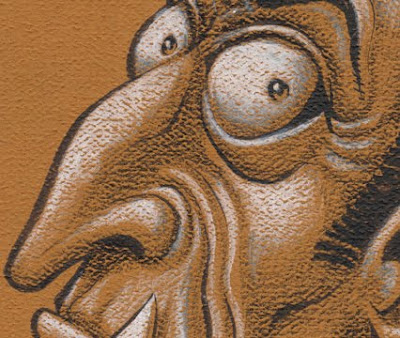
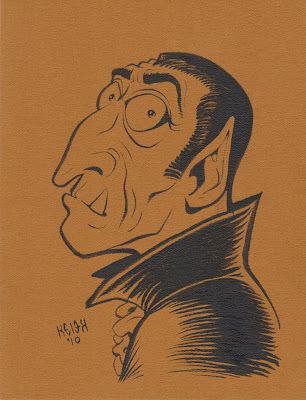
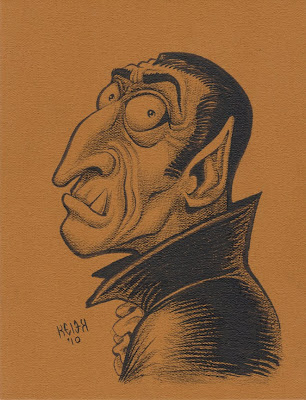
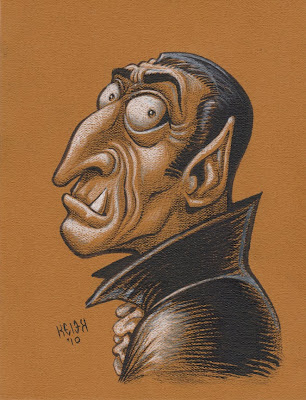
DRACUPIRE PENCIL DRAWING Step-By-Step

My guitar project from the last posts is on hold until my hardware arrives in the mail, so in the meantime I'm doodling.


This is how I do most of my colored paper pencil drawings. The only thing that changes is the black. Sometimes I use ink, and sometimes pencil. This particular drawing has both black pencil and ink, in addition to white pencil.

At 1st I very lightly roughed in an ellipse with a nose on it (with a normal erasable No.2 pencil) to show me how much room I needed for the head. Then I inked in this drawing with a BLACK Sakura SumiBrush pen. When I finished inking I erased my rough-penciled ellipse.
CLICK TO ENLARGE

After the inks were completed I used a BLACK Prismacolor pencil to shade the drawing. The Prismacolor pencils have something in them to make them permanent. Any erasing will be met will either minimal or no success. It's best to start light and work it darker as needed. Try to avoid needing an eraser.
CLICK TO ENLARGE

Now I add my highlights with a Prismacolor WHITE pencil. This is the easiest step, and most rewarding. It's what I look forward to each time I make a drawing like this. Less Is Better. It's tempting to go crazy with the white, but you don't need to. Most of your work is already done with the blacks. The white is just for the tops of things. His tooth and eyes got a little extra just because they are supposed to be white.
CLICK TO ENLARGE

Bear in mind these drawings only work on colored paper. Any color is fine. Old paper grocery bags are great if you don't want to go out and buy paper. A nice thing about doing drawings like this is it doesn't require a ton of supplies or setup time. All you need are 2 pencils and some paper. Maybe an ink pen if you desire.

Wednesday, May 12, 2010

ELECTRIC GUITAR PROJECT part 4

After the glue dried and the clamps were removed, this is what I had.

The fretboard is not exactly the same size as the neck in the tapering width direction. I made the neck a little bit extra wide so I'd have something to work down.

I sanded the neck flush with the fretboard on an edge sander. After bandsaws, edge sanders are my favorite power tools. In this picture you can sight down the neck and see the fretboard is level. I laid a straight edge across it and tapped down any high frets. I found 2 spots still needing attention. Also in this picture you can see the frets were sanded flush with the fretboard.


This ledge at the top is where the nut will sit. I re-rounded the back of the neck after flushing it up with the fretboard.

In this picture I'm in the process of rounding the end of each fret with a file. Otherwise the edges of the frets are sharp like knives. That's bad if you wanted to play a sliding ZOOOOOOOOP! on your strings.

I made fret markers by drilling holes and gluing in dowels. After the glue dried I used a chisel to cut them flush with the fretboard. I made the fret markers smaller than normal just for the sake of being different.

Now I need to impatiently wait for my hardware to arrive in the mail before going any further. Even though it would have been a lot more expensive buying the hardware at a music store, there's something to be said for instant gratification.

Tuesday, May 11, 2010

ELECTRIC GUITAR PROJECT part 3

Today I'm glued the fretboard to the neck. I left a little flat spot at the top for the nut (about 1/4") and glued the fretboard down starting there. I centered the fretboard in the width of the neck. It's important the fretboard is centered pretty well or later the strings will gradually drift away from the thru-neck. That would be noticeable since the neck has the maple/walnut stripes in it. I'd hate to have to mount the bridge off-center too.

The fretboard is very hard ebony wood, and I don't know if it was necessary or not, but I worried the glue wouldn't absorb as much as in a regular piece of wood, so I scratched up the back of the fretboard with a knife. That hopefully gives the joint more tooth to grip.

The more clamps the better. A few more would have been nice, but this should be fine.

Those are paper towels under it to catch glue drips. Hopefully there aren't any though. I used a wet rag to wipe off any excess glue I could see. If you don't wipe off the glue it will fill the grain pores, and then those spots won't take stain later on. I don't know if I'll stain it or not, but I'm prepared either way now.

Monday, May 10, 2010

ELECTRIC GUITAR PROJECT part 2

One of these will be the neck for my guitar. The more laminations in a piece of wood the stronger and studier it will be. This is alternating maple and walnut. My coworker and I are both building guitars at the same time and we made several necks while we were at it.

I don't like bolting a neck to the body so I'm making a thru-neck which will span the entire length of the guitar. This is both easier to construct and stronger. Right now the necks are extra long, and will be cut to length as needed depending on the body style.
The backs of the necks were shaped round. The bulk of the work was done with a router, and then the final smoothing was done using the drum end of an edge sander.

Then the round was tapered into the flat of the head. I like the way the walnut stripes follow the curve up into the head.

Here's a top and side view. More to come later.

Sunday, May 9, 2010

ELECTRIC GUITAR PROJECT part 1

For a while I've had some guitar parts laying around. I'm finally getting around to making an electric guitar. I'll document the steps as much as I can. This is going to get done a little at a time. I'm still waiting on some hardware I bought from ebay. The prices were good but I suspect the wait is going to be painful. I ordered 6 tuning keys ($8 incuding shipping) and a tune-o-matic style bridge ($6 including shipping.) They're being shipped from the other side of the planet.


The 1st thing I'm working on is the fretboard. Each fret is roughly measured and cut a little bit long.

The fretboard I got was already slotted but I have to put my own frets in the slots. If you are thinking about making a guitar I recommend you find an already-fretted fretboard. This is the toughest part of the entire project.

There is a slight arch in the fretboard. I am pre-bending my frets to match the arch of the fretboard. If I don't then the frets tend to seesaw back and forth as I tap in each end, rather than seating themselves properly. These frets are very thick. If I used smaller frets I don't believe it would be as big of a problem.

With a bandsaw I cut out an arch in a piece of wood to match the fretboard's arch. This is my tapping block. I drive each fret in the same way, by laying the block on the fret and driving it in with a mallet.
Each time I drive in a fret I check it closely and make sure it's driven in as tight as possible. A piece of paper should not be able to slide under it. If one fret is higher or lower than the rest it will cause the strings to buzz on undesired frets.

To fix that problem the frets must be filled level and then the newly flattened fret tops must be re-rounded, if that makes any sense. In other words, it's best to just get them right the first time. I went over them 3 or 4 times after I thought I was finished, and kept finding new spots when they could be driven in more.

DAGNABIT! This was not expected. The frets were so fat they bowed the fretboard by wedging it a smidgen at a time over the length of the fretboard. I don't believe it's gonna be a problem because it flexes right back flat again with very little effort. Once it's glued down onto the neck it should be fine.

Friday, May 7, 2010

Thursday, May 6, 2010

MATH IS HARD part 2

This is another version of the last post, which proves math is hard. I can't figure out how to type the line over the 9 to make "POINT NINE REPEATING" so I will write it like this: .999999.....

-------
(If I start with this)

X = .99999....
-------
(And then I multiply each side by 10)

10X = 9.99999....
-------
(Since X = .999999... that's how much I will subtract from each side to reduce)

9X = 9
-------
(Now I divide each side by 9 to reduce again)

X = 1
------------

But earlier X = .9999....

So does this prove
1 = .999999......?

I wish I'd have known about this in school so I could have explained the futility of learning math. That would have saved a lot of time. Maybe my teacher would have said, "Yes, go out and play until we fix math. No sense in teaching it until we get all the bugs worked out."

Wednesday, May 5, 2010

MATH IS HARD

Does this make sense?

1/3 = .3333333....


The what's up with this?

1/3 = .3333333....
1/3 = .3333333....
+ 1/3 = .3333333....
------------------------
1 = .9999999....

If you were using a ruler to measure something then .9 REPEATING is basically one. Technically it's not really equal though, right?

Monday, May 3, 2010

NEW ENDING FOR THE WIZARD OF OZ

Years ago I made up a new ending for The Wizard of Oz. The story happens just as it did in the original movie - up until the very end where the Wizard is giving them what they want: courage, a brain, a heart, and the ability to go home.

My ultimate wish is to find perfect look-alike actors and build the set just like in the movie, and film this and do some splice trickery to the end of the real movie. Then observe people's reactions while watching it. I guess that would be fun. Maybe after they sat through the bulk of the movie waiting for the happy payoff and then they see this I'd feel kinda guilty.
----------------------------------------------------------

WIZARD
(to Tinman)
My dear friend, do you not know
you've always possessed the ability
to have what you want?

TINMAN
Huh?

WIZARD
(pointing at the axe in
the Tinman's hands)
It is there. Your axe.

TINMAN
My axe?

SCARECROW
His axe is a heart?

WIZARD
No, but it is a tool for acquiring
a heart.

LION
W..W..We don't understand.

DORTHY
That's right, Mister Wizard. We
really don't understand at all.

WIZARD
Dorthy, my child, you are a very
brave girl.

DORTHY
Oh thank you, Sir. That's just
what Auntie Em always says. She
says I've always been a very
brave girl.

WIZARD
Yes, and do you know the reason you
are so brave?

DORTHY
I . . . I . . . No, I don't know
why. I guess I just am. That's
all.

WIZARD
You are brave because you have
backbone! . . . Good strong
backbone!

The Wizard turns to the Lion.

LION
Gulp!

WIZARD
Mister Lion, you wish to be brave.
Do you not?

LION
Y..Yes sir.

WIZARD
And why is Dorthy so brave?

LION
S..S..She has backbone?

WIZARD
Correct! That is correct, indeed,
my good Sir. So what do you think
it is you need?

LION
I..I..I..uh, I--

SCARECROW
--He needs a backbone!

WIZARD
That is right, Mister Scarecrow!
Very good!

The Scarecrow beams with pride.

WIZARD
Just as you need a brain, and the
Tinman here needs a heart.

TINMAN
So . . . How does my axe have
anything to do with all this?

WIZARD
(thoughtful pause)
Well, my friends, Let me ask Dorthy
one last question.

DORTHY
(puzzled)
Okay.

WIZARD
Dorthy, what is it you want? Why
did you come here? What do you
wish of me, my child?

DORTHY
To go home! Oh, Mister Wizard, I
want to go home! I want ever so
much to go home!

WIZARD
And home you shall go.
(to the Tinman)
Tinman? I think you know what to
do.

TINMAN
(confused)
I - I really don't, sir.

WIZARD
Your axe. Use it. It is the
answer to everything. Send her
home. Send Dorthy home . . . to
the Promised Land!

The Tinman gets a crazed, yet fearful look in his eyes.

DORTHY
What do you mean? Mister Wizard!
What are you saying?!

SCARECROW
She has a brain! Do it, Tinman!
Do it!

LION
I want her backbone!

TINMAN
(approaching Dorthy)
Dorthy, I . . . It's something I
must do.

DORTHY
What?! No! Stop! Don't come any
closer!

The Lion and Scarecrow begin closing in on Dorthy, along with
the Tinman.

SCARECROW
Dorthy, be calm. This is something
that's good for everybody. Just
relax.

LION
Yeah, Dorthy, just relax.

DORTHY
NO! NO! Stay back! What is
happening?! Toto, sic! Sic, Toto!

Toto jumps frantically to bite at the Lion.

The Tinman raises the axe over his head.

TINMAN
Dorthy, I'm sorry. I need your
heart.

WIZARD
(grinning)
Do it! Do it, my boy!

The Lion and the Scarecrow are watching in anticipatory joy.

DORTHY
No! No! No!

The Tinman swings the axe, and it hits Dorthy directly in the
side of the neck.

Dorthy's eyes glaze over and she falls to the ground. The
axe is affixed to her neck, and it stays there as she falls,
and her body settles into a still position.

The Tinman puts his foot on Dorthy's shoulder, and pries the
axe back out of her neck. It makes a wet, chunky sound as it
finally tears loose.

He swings it again, at her chest this time.

The Tinman reaches down and pulls open the freshly-made chest
wound, and puts his cold, metal hand inside.

The Tinman pulls out her heart, and stands up. He opens a
door in his chest, and slings the heart inside.

TINMAN
I'm so happy for Dorthy.

SCARECROW
Yes, she's home now.

TINMAN
Hey, I just realized, I feel love
for Dorthy! I can love! It must
be the new heart!

LION
Sweet Dorthy.

WIZARD
Well, Tinman, you aren't the only
one who needed something, are you
now?

TINMAN
Oh, Right.
(to the Lion and
Scarecrow)
Roll'er over boys.

The Scarecrow and Lion roll Dorthy's limp, heartless body
over, so it is face down.

With the first swing of the axe, the Tinman cuts off the top
of her skull. A fresh glistening pink brain is exposed.

With the second swing, the Tinman opens up her back, exposing
her juicy backbone. He makes a few more whacks to open the
full length of the spine.

TINMAN
Well, have at it, boys!

The Scarecrow and the Lion dive in.

The Scarecrow digs her brains out, and begins eating them.
His emotionless eyes stare blankly into the camera, as a
small bit of brain-pulp drops from his lip.

The Lion stands on Dorthy as he grabs her spine. With a
couple firm and forceful yanks, he manages to tug it loose.

The Lion devours the spine slowly. It is very gristly, and
crunchy.

The Lion and Scarecrow stand up, and join the Tinman.

The Lion stares at Dorthy's disgusting corpse.

LION
You know, normally, the sight of
something like that would terrify
me. But now it doesn't bother me.

WIZARD
You're brave now. See? You have a
backbone. I'm very proud of you
all.

SCARECROW
Proud. Adjective. Definition one.
A feeling of self-respect or
pleasure in something by which
you measure you self-worth; or
being a reason for pride.
Definition two. Having or
displaying great dignity or
nobility.

The Scarecrow looks very happily surprised with himself.

WIZARD
(wide-eyed surprise)
Well done, my brainy friend!

LION
Wow!

TINMAN
That was amazing!

The Lion begins staring at the Wizard. The Wizard senses the
strange stare.

LION
(talking to Tinman, while
staring at the Wizard)
Hey, let me borrow your axe. I'd
kind'a like to have some brains
like that, myself!

WIZARD
Gulp!

TINMAN
Heck, if you're gonna open him up
too, I think all three of us could
benefit.

SCARECROW
Yes, I want to love.

The Wizard begins backing up slowly, and then turns to run.

WIZARD
AAAA!!!

The Scarecrow, Tinman, and Lion chase the Wizard down the
long emerald green hallway, and out of sight.

Toto stays behind and laps up the blood of Dorthy.

FADE OUT.

THE END.

(Credits)

Sunday, May 2, 2010

POETRY BY KW MONSTER

I hope these are entertaining. As always, I made these poems with hopes of turning them into songs later on down the line. They aren't very long, but add in guitar solo, and a section of La-la-las, and then repeat the verse and Presto! Full length song!

-APPLE-
I'll take your Adam's apple
And the Apple of your eye
I'll mix them both together
And have an apple pie

-ULTIMATE OLYMPIC CHAMPION-
I've got swimmer's ear
I've got tennis elbow
I've got athlete's foot
I am the ultimate olympic champion

-99 BOTTLES-
99 bottles of nitroglycerine on the wall
99 bottles of nitroglycerine
If one of those bottles should happen to fall
No more bottles of nitroglycerine on the wall
Related Posts with Thumbnails