Wednesday, June 30, 2010
PHOTO OF GIANT DOG
I like this picture of my dog, Lucy. For some reason the perspective makes it look like she's as big as a horse, or maybe even bigger.

Tuesday, June 29, 2010
ELECTRIC GUITAR PROJECT part 11
I am playing around with the idea of having an atypical tail piece for the guitar I'm building. There is a strong possibility I'll regret the time I'm spending on this tail piece. It may look gaudy and corny. When it's finished and sitting on the body next to the rest of the hardware I can judge better.
I bought a Gibson-style tail piece and it's ready to go if this idea fails. My thinking was since the guitar has stripes in it from the different wood species, maybe I could incorporate a stars and stripes flag motif into the design. I don't think I'd paint it red, white and blue. It would just be a subtle implication.
I bought a Gibson-style tail piece and it's ready to go if this idea fails. My thinking was since the guitar has stripes in it from the different wood species, maybe I could incorporate a stars and stripes flag motif into the design. I don't think I'd paint it red, white and blue. It would just be a subtle implication.
First a piece of aluminum was sliced down to 3/8" thick. This stuff is pretty soft; you can cut it on a plain ol' bandsaw.

Next I drew my star shape onto the piece with a Sharpie. I drew it close to the edge so I wouldn't need to do as much cutting. The red lines are going to be slots for the strings to pass through. I measured the spacing to match the bridge. The 2nd and 5th lines had to be slanted so they didn't run through the bottom points of the star.

The star shape was cut out on the bandsaw. Aluminum heats up really fast. It's good to keep a bucket of water handy and dip the piece every once in a while. That saves your fingers.

The string slots were cut next. The star was stood up on edge with a support block behind it, and the slots were cut on a bandsaw. All the slots are the width of the bandsaw blade except for the last 2. The 2 thickest strings needed more room so those slots were widened just a tad. This will be the bottom face of the tail piece. Each string has a metal ball on the end of it to catch at the beginning of the slot, and the rest of the string will pass through and out the other end to the bridge.

Then the tough part began. I wanted to shape a beveled edge onto the top face so it didn't look so plain. This was done with grinding wheels and files. Even using a file will heat up the aluminum. I dipped it in water often during this stage.

Here I'm still working on getting the corners sharp but it's taking shape. After the final shape is achieved I will use progressively finer grits of sand paper to smooth the surface. Eventually I will polish it and it will shine like a mirror. Also I need to think of a way to attach it to the guitar body. I may need to drill 3 small holes through it for screws.
 All of this depends on what it looks like when it's done. If it looks silly I may scrap the idea and use my standard tail piece. I hope I didn't do all this work for nothing.
Sunday, June 27, 2010
OLD HORRIBLE COMIC MADE WITH AUTOCAD
When I first learned AutoCAD back in 1994 I thought "Wow! I could just draw one picture and copy it a bunch of times!" It doesn't seem like that big of a deal today. I hate that font.


Friday, June 25, 2010
CAP'N CRUNCH PADDLE BOAT PREMIUM
This is a send-away premium from Cap'n Crunch cereal. It's the most elaborate cereal prize I've ever seen.
Some guy on Ebay is selling a bunch of them. He must have looted some abandoned warehouse. You get them in the original box they were mailed in back in the day.

I got this for $6 plus shipping which is a really good price. I saw some people selling this same thing for $35 and even $60. If you want one you should hurry up. He had a limited supply.

The instructions seem kind of complicated for a kid.

Yikes! Look at all the little finicky pieces! This is probably one of those projects the dad had to do while the kid sat and watched.

It came with 3 rubber bands and they are still in a worthy rubbery state.

Stickers for extra realness!

These paddle boats come in the original boxes and I don't think the parts inside have seen the light of day for decades.
 I guess I'll eventually put it together. In the meantime if you want to see what it looks like assembled...
A guy named Jeff Pidgeon got one and put his together. Here's a picture I totally ripped off his blog. I hope he doesn't mind. He has bunches of cool toys and drawings. You ought to check him out by clicking HERE.

Thursday, June 24, 2010
THE JILTED LOVERS CLUB logo design
Here's a logo design I recently did for a band called The Jilted Lovers Club. They wanted it to resemble neon lights. I tried it at first with white in the centers of all the letters but it made the letters seem difficult to read.

Here was the runner up design. The letters form a heart with a dagger through it.

HERE is a link to their website, and you can hear two songs they wrote and recorded. The lead singer is very sweet and her dad is an animator, so that makes her extra cool.
Here was the runner up design. The letters form a heart with a dagger through it.

HERE is a link to their website, and you can hear two songs they wrote and recorded. The lead singer is very sweet and her dad is an animator, so that makes her extra cool.
Tuesday, June 22, 2010

Monday, June 21, 2010
ELECTRIC GUITAR PROJECT part 10
These are the continuing tales of the guitar project I'm completing as I get around to it.


Here the neck is being glued into the body. The more clamps the better the joint. I used 3 hand clamps, and a bar clamp to squeeze various spots and directions. I was worried my wife would bump it so I put a watchdog on the case until the glue dried.

After the glue dried I got my chiseled the butt end of the thru-neck to match the shape on the edge of the body. Since it was mostly end grain there wasn't a real good direction to go at it. For the most part I went with the grain, and then went from side to side to smooth out some chisel marks.


I used some sand paper of sequentially finer grits until I'd sanded all the chisel marks out, and has a nice flushed-up joint.


There was a 1/16" gap on the left side of the thru-neck (you can see it in the previous picture.) I put a feather edge (thin wedged strip of mahogany) in that crack and sanded it flush with the face of the guitar. Since it's a wedged strip of wood a feather edge can be driven in until it won't go any further, and it will bow and flex as needed to close up a crack of randomly varying gap sizes. If you look closely at the left side of the neck you can see the feather edge. Once it gets finish it shouldn't be noticeable.


The last thing I did was bore 2 holes for a bridge to be mounted. I double, triple, and quadruplely checked and rechecked my dimension before boring the holes.
I double checked my left-to-right distance too. Back in high school the very 1st musical instrument I ever made was a learning experience of the most painful kind. I didn't get the bridge centered properly in relation to the neck. The strings hatefully and disgustingly hung off the edge of the neck on one side. I believe that guitar was properly disposed of in Pete Townshend fashion.

Every fretboard I get seems to have a different overall scale. If you measure from the nut end of the fretboard down to the 12th fret and double that distance, and that's where the bridge goes. That works no matter what scale the fretboard is. On this particular guitar the distance to the 12th fret was 12 3/4" (a hair more) so the distance from the nut to the bridge was 25 1/2" (a couple hairs more.)
At work when someone says it's "a hair more" we usually have to ask what kind of hair.
Nose hair = 1/64"
Armpit hair = 1/32"
Butt hair = 1/16"
That's industry jargon and most furniture builders know this popular rule of thumb.
Saturday, June 19, 2010
ELECTRIC GUITAR PROJECT part 9
In the last episode I put a wedge under the neck to put it at an angle for the bridge. Now I'm going to need to cut that much of the angle out of the neck because 2 objects can't occupy the same space unless I'm living in the 4th dimension.
After the wedge is in place, you can see how much it angularly kicks the neck up out of the body.

I mark a line as to where I need to remove some wood from the neck.

Then I cut that pencil line on a bandsaw. I left the line a little heavy so I could sand it down. Please ignore the rude thing that wiener dog is doing in the background.

Now the neck lays into the body just a hair high for sanding it flush. You can see bandsaw marks across the thru-neck but those will all be sanded away after it's glued in place.

The butt end of the thru-neck will need to be hand-carved to match the shape in the body. The goal will be to make it flow around so smoothly even a braille expert wouldn't be able to feel where the joint stops or starts. Hopefully it works out that way.


Friday, June 18, 2010
ELECTRIC GUITAR PROJECT part 8
Here continues the ongoing saga of how I built my electric guitar. One of the more important features on a guitar is the action, or how close the strings are to the frets. Ideally they should be close enough it is effortless for the player to push them down, but not too close of they will buzz on all the frets in front of your finger.
I laid a straight edge across the frets and measured how close the tops of the frets are to the face of the body. It's 5/16" away.

I laid a straight edge across the frets and measured how close the tops of the frets are to the face of the body. It's 5/16" away.

Then I measured the height of my bridge. It is adjustable in height, and the lowest position is 5/8" which is double the "fret-to-body" distance. That means my strings would be 5/16" too high above the frets.


To remedy this I made a wedge to lay under the neck which will cause it to sit at an angle in relation to the body. The wedge starts out at 3/8"(the size of the difference plus some wiggle room for thumb wheel adjustment on the bridge) and then tapers to nothing. Now when I sight down the length of the fretboard it should point at the top of the bridge after it is seated.


I will glue it in the neck slot, thick end toward the butt of the guitar body, or toward the head end of the wiener dog. It's a tad longer than the notch so I can trim it to fit the body after the glue dries.


Wednesday, June 16, 2010
KING KONG SOUVENIR FROM NEW YORK
I really liked this when I saw it in the store. After buying it I obsessively worried I'd break the antenna off the top. See how skinny it is? It looked really fragile. I was making a conscious effort to baby it all day while site-seeing. When I got it back to the hotel I'd worked myself up into a nervous wreck. I realize now it's silly but it consumed my every thought for the several days while I was there. If it broke it would ruin the whole thing. It wouldn't look like the Empire State Building anymore. I kept thinking about how much more handling it was going to receive before I could finally sit it on a shelf back at home. I just new those guys in the airport would fling it in the baggage truck and snap it off.

In the hotel room I carefully wrapped toilet paper around the antenna, and then wrapped tape around that, and then I wrapped that with newspaper and that with a sock. Then I put that in a bag and wrapped that in a t-shirt, and put that in my boot. Then I placed the boot in the center of my suitcase with clothes surrounding all sides of it.
All the way home I fretted about it. When I got home I opened the layers of wrappings and was relieved to see it was still intact. At closer examination I learned it was a pressed-in antenna and it was made of very flexible rubber. I don't think it would have broken even if it were dropped from the Empire State Building. Now I have mixed feelings about it. I don't like it as much after learning it's not all fragile. I don't know why.
Monday, June 14, 2010
KILLER McBASH MODEL KIT
I bought this a few weeks ago. I love Weird-Ohs, Nutty Mads and Big Daddy Roth Rat-Fink type toys and model kits from the 60s. This particular model is a modern-day reissue. The price is a whole lot better and it's same amount of fun.

As much as I love it, I suspect it will end up in this closet along with all the other model kits I've never built.
 See that Spider-Man web-blaster in there? I have absolutely no memory of putting it in there or where it came from. Sometimes I see something at a yardsale and stuff it in this closet the same day I buy it. Then I don't open the closet for several years. Who knows what's in there under the 1st visible layer.
Thursday, June 10, 2010
ADDAMS FAMILY CANDY CONTAINERS
I remember not liking this new version of the Addams Family back in the early 90s but I do like these candy containers. I got them for $1 each. They still had candy in them. It looked like something Uncle Fester would have eaten. It took me 30 minutes to wash them out. The heads are all hinged and the heads flip up for candy access. Uncle Fester is my favorite of the three.

The Original:
The new version:

They pale in comparison to the original characters, but until they make candy containers of the original guys I guess they're better than nothing.


The Original:
The new version:
Wednesday, June 9, 2010
ELECTRIC GUITAR PROJECT part 7
This is the continuing saga of How I Built My Electric Guitar (That I Haven't Finished Yet.)
Currently I've shaped the edge of the body, and cut a notch for the thru-neck.

Currently I've shaped the edge of the body, and cut a notch for the thru-neck.

Here's a tail end view:


And and neck end view (The grain shows up really well in this photo):


Instead of doing a rounded edge like on a Stratocaster I tried something different. I put a deep cove in the edge of the top face.


I didn't want to lose the "horn" points in the flat of the surface, so the shape doesn't reach in as much around that area. I did a gradual tapering out so it wouldn't be noticeable. You can see it better in the picture after this one.


A picture of the neck and the body.


The notch is just a smidgen larger than the neck so the neck will drop in easily.


Later when I decide just exactly where I want the neck to rest I can trim off the excess at the butt end, and shape it to match the shape of the body.


It's finally starting to look like a guitar but I still have a lot more to do on it. I'm trying to come up with a way to put in the pickups so I remove the least amount of wood possible. I don't want to lose all of the stripes in the thru-neck. I guess I'll be routing in from the back, and then cover the back with a plate (unless anyone has a good idea for me.)
I could route pickup slots in the face too, but if I do then they will require additional plates for something to screw the pickups to. That means more of the wood would be hidden. I want as much wood as possible to show. A lot of my striping got covered up by the fretboard, but other than using a clear fretboard I couldn't think of any way around it.
Monday, June 7, 2010
ELECTRIC GUITAR PROJECT part 6
I got some hardware in the mail so I've been back at my guitar project.
This is the stuff I ordered. A bridge and some tuning keys. I separated one of the tuning keys to show how it stacks together. The largest part (with the key) pokes up through the back of the head, then the washer lays down onto the face side of the head, and the threaded part screws down through the washer, over the pin and onto the large keyed part. a small screw holds it all from spinning around.
 I'll still need a tail piece to hold the strings but I want to work that out later after I see the shape of the guitar. Also I'll need pickups and volume and tone knobs. And a jack. And some other odds and ends.
Here's the piece of mahogany for the body. It's 1 1/2" thick.


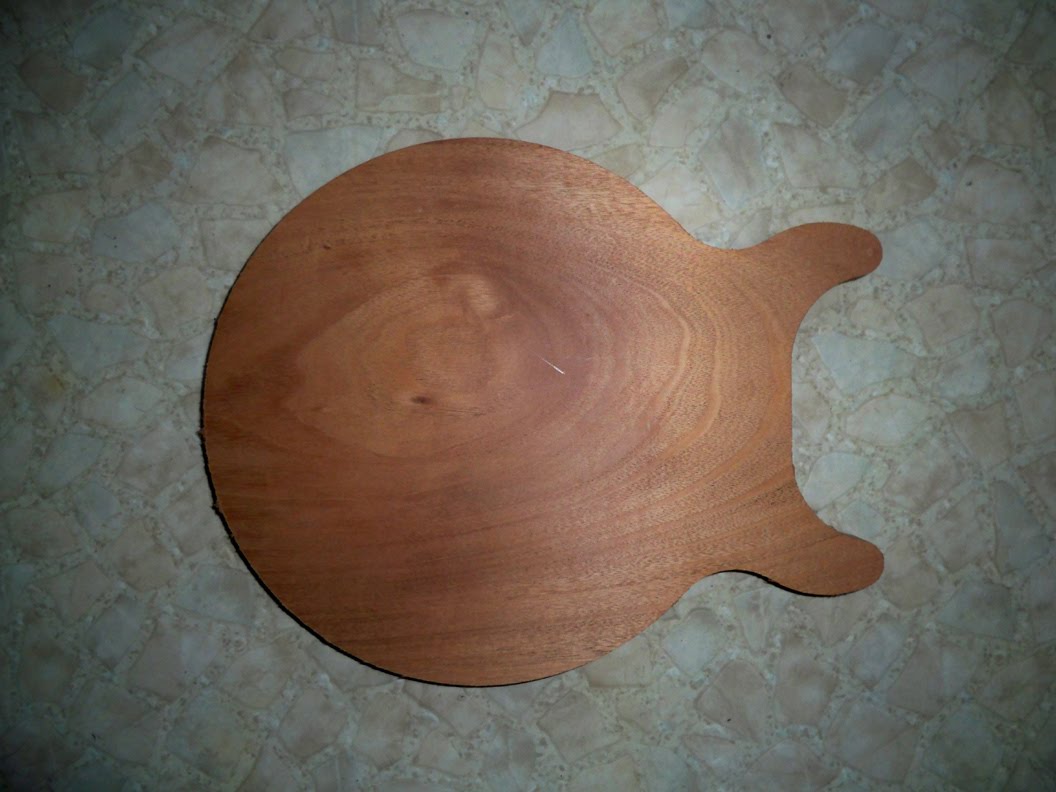
Here I cut out the body shape. I really like symmetrical body designs. I'll also put a shape on the edge and cut a notch down the middle to accept the thru-neck. This body is 12" wide and 15" long. It's a smaller body than most guitars. I like that. Heavy bodies do produce more sustain from the strings, but I have a heavy guitar already. I'm wanting a nice, light, comfortable, un-awkward guitar these days.
 Anyhoo, since it's an electric, if I do need more sustain sometime I can get it with effects pedals.
 Anyhoo, since it's an electric, if I do need more sustain sometime I can get it with effects pedals.
Friday, June 4, 2010
HULK TOY FROM THE 70S
Somewhere on him it says Mego and he stands 12" high. Seems like every kid I knew back in the 70s coveted one of these.

There was also a Remco Spider-Man toy which came out around the same time. Its arms and legs didn't move so neither I nor any of my friends wanted that one. I remember its hand was in a fixed upward web-shooting position and there was a retractable web (string with a hook on it) which would hoist him upwards. I kind of wish I had him now.

There was also a Remco Spider-Man toy which came out around the same time. Its arms and legs didn't move so neither I nor any of my friends wanted that one. I remember its hand was in a fixed upward web-shooting position and there was a retractable web (string with a hook on it) which would hoist him upwards. I kind of wish I had him now.
Subscribe to:
Posts (Atom)