Friday, May 13, 2011

CIGAR BOX GUITAR - Part 5 of 10

Day 5 of my Cigar Box Guitar Project:

To make a gradient shade around the edge of the headstock I used some watered down Burnt Sienna acrylic paint. It was diluted extra just in case, so when I applied it I could keep adding more until I got the shade I wanted. It's about half way there in this picture.

After the paint dried I put a block on the inside of the box, and used that to screw through, into the neck. If I didn't use the block and just screwed the neck to the flimsy wall of the box it probably wouldn't have been able to support all the stress of the strings.

It had 3 screws, but just to be safe I drilled a deep hole and glued a dowel in for extra strength.

Here it is after the dowel was trimmed flush with the block.

After that, the labels were glued to the front and back faces of the box. Before gluing them down I burned the edges in a few spots. Playing with fire is pretty fun so I had to restrain my desire to go crazy with it. I limited myself to 2 or 3 burn spots per label.
And that's a good stopping place for today. Stay tuned.

Thursday, May 12, 2011

CIGAR BOX GUITAR - Part 4 of 10

Day 4 of my Cigar Box Guitar Project. Today I tackled the Nut and the Bridge. Below is a base or saddle for the bridge. Whichever you like to call it. It will hold the bridge upright.

Bridges are easier to adjust height-wise if they aren't permanently glued down, so a slotted base is what I like to use. The tightened strings hold the bridge down onto the saddle. If the strings are too high I can sand the bottom of the bridge down and then click it back into the saddle. If the strings are too low I can put a strip of veneer or some credit card plastic under the bridge. So far I've never had to do that, but the option is there if I need it, and I have been trying to come up with a good excuse to cut up some of Mei's credit cards.

Here's the Nut. It's wide at the bottom for sturdy support, and then thin at the top so the strings are resting on a sharper edge.

On the other side you can see 2 pencil lines. the lower line represents the fretboard surface. The upper line shows me how deep the string grooves need to be. The distance between those 2 lines is just barely more than the height of a fret.
That's what I did this day. It doesn't look like much but it did take a while since the parts were so little and finicky.

More to come.

Wednesday, May 11, 2011

CIGAR BOX GUITAR - Part 3 of 10

Day 3 of my Cigar Box Project. I drilled the holes for the tuning keys and that completes the neck.

The holes aren't symmetrical, but that's the only way they'll fit on the headstock because...

...I'm not using proper 3-key left and right set of strips. Both are rights because I split a full 6-key strip in half. It's a tight squeeze but if I jostle things around just right there's room for it all.

Next the fretboard was glued on. The neck was made just a tad wider than the fretboard so I could sand it down flush with the fretboard.

Here it is after being flushed up.

My friend Bob helped me print the image I found online with a laser printer on slick paper. There are 3 different images on the page but I decided not to use 1 of them.

I glued one of the labels to the headstock. That fancies it up purty nice. Soon this little Big Wolf will howl.
Stay tuned for further developments.

Tuesday, May 10, 2011

CIGAR BOX GUITAR - Part 2 of 10

Day 2 of my Cigar Box Guitar Project. It's not easy to find a chunk of wood 3 inches thick without paying big bucks, so I glued two thinner pieces together. This is better anyway when it comes to necks on musical instruments.

I can reverse the grain directions in the two pieces so if warping tries to occur, both halves will work and pull against each other and not let that happen. To reverse the grain direction, you just need to look at the end of the board, and whichever way the grain arches are cupped, orient the other piece in a mirrored direction. I suspect that makes no sense. If so ignore it.

I sketched out the edge profile and cut that on a band saw.
Then sanded the fretboard surface flat.
Then I sketched out the top face. It all has to be custom to fit the tiny fretboard.

These strips of wood were selected because the grain arches were centered pretty well in the strips. If you look at the sawn section of the headstock you can see the grain arches. If the arches aren't centered then later on it may want to warp and twist in a weird direction. Now if it wants to warp it will pull the same on both edges, and then the opposite piece of wood will pull in the other direction. It has 2 choices: either stay where it's at forever, or explode.

Here's the side view of the neck. Lucy was distrustful at first.

Later she relaxed and allowed it to coexist in her world.

Next the top profile was cut out on the band saw. I left the headstock big since I hadn't yet decided on a pattern for that.

Rounding the back was done on an edge sander. It seems like a tricky job but really it's pretty quick and painless. The entire operation took 10 minutes or less. If I tried to do it with chisels I'd have spent a few hours trying to get it even. On the edge sander I can drag the length of it across the drum on the end of the sander. Then rotate it a bit and drag the length of it across again, and just keep repeating that until I've went around the entire back face. To do this you need some pretty coarse sand paper.

Lastly I drew out a headstock shape to fit my tuning keys and cut that out on the band saw. The pencil marks show me where to bore for the keys. Since I cut a 6-Tuning Key Strip in half (in the last episode) the keys can not be symmetrical. It doesn't bother me though, since it's a clunky cigar box guitar after all. It adds to the whimsicalness of it.

Next time on "Cigar Box Guitar: The Series," I'll cut those holes and stick that fretboard on that neck!

Monday, May 9, 2011

CIGAR BOX GUITAR - Part 1 of 10 ( I promise!)

My buddy Wayne found an rusty, broken, old 1960s Japanese guitar in his friend's garage. He and I were salvaging usable parts when tragedy struck. He needed the fretboard for a project he'd already started but when he was removing it from the neck it broke in half.

I didn't see it happen but I'm sure he wasn't too happy about it. It sat in the garbage for a day or two. I've been wanting a ukelele-sized guitar for a while so dug it out of the trash. Fortunately it broke off at the skinny end. If it had broken off at the fat end I couldn't have used it.


With a little cleaning the tuning keys were usable too.

I cut this strip of keys in half because I needed a symmetrical setup with 3 on each side. It was cut at a diagonal so there would be a little bit of metal I could drill for screws. It ain't pretty, but it's ugly.

I saved as much as I could on the fretboard. It ended up with 13 usable frets. The top one is going to have to be removed because the nut will go there.

The fret markers are now in the wrong place since the top end of the fretboard was lost. There was enough of the broken end to cut 4 plugs of wood. The incorrect fret markers were drilled out and patched with the plugs. Tada!

You can barely see the patches since they're made from the same wood. You gotta look really close.

I had two cigar boxes to choose from. My original first pick was this one with the cool designs all over it.

Inside had another loose label. I thought I could use that to cover the headstock so it all matched. The only bad thing about this box is the size. It's really tiny. I doubt I'd get much sound out of this little thing.

My second option was this larger, but more boring box. Even though it's not anything to look at, the size is perfect.

It's pretty well built too, with finger-jointed sturdiness.

There is a design on this box but it's on the inside, which does me no good.

After tormenting myself over this for a couple days I realized I could just google search for high res cigar box labels and print and glue it on myself. These were my 2 favorites. The "Crusader" seems obnoxiously funny to me.
The other one I liked was the "Big Wolf." In the end I thought this one was better and funnier since it said "BIG." That seemed even more obnoxious for a mini guitar.
Stay tuned. Tomorrow I'm going to carve out the neck.

Sunday, May 8, 2011

FRANK, BAT and MUSTACHIOED MONKEY-FACE MAN

Here are some post-it note doodles that have been scanned and colored. I like the look of simple 2-tone shades much more than airbrushed shading when it comes to black outlined drawings.


I don't enjoy modern comics because of the airbrushed shading they all have. I don't know exactly why it bothers me so much. Maybe it's because of nostalgia for the older flat color style. It wouldn't bother me so much if all the objects had a singular light source, but when I see them it looks like different objects in the same picture are lit separately in a way so each object has it's own uniquely-placed spotlight.

It's weird (to me) to shade something if it's already outlined. If it's shaded then the outlines aren't even necessary. If something isn't shaded then outlines are needed to delineate the forms and shapes. Having both is like wearing boots on top of shoes.

Since I'm already whining about comics, also I don't like the shiny glary paper. I liked old newsprint. It's both cheaper AND easier to see. Also it tones down the gaudy primary colors into something pleasing. I miss the advertisements too. Twinkies ads were just as fun as the actual comics pages.

I always wonder if they quit spending so much time airbrushing, and used cheap paper, and made the books half-full of ads if I could afford them again.

Whoever's in charge, hurry up and fix this stuff!

Monday, May 2, 2011

WRASTLIN'-WEIRDOS

This started out as an early brainstorming pencil sketch for a cd design. Later the design plans changed but I still liked the sketch so I went ahead and inked it.

Sunday, May 1, 2011

HEAD DOODLES

That 80s band, Men Without Hats hates both of these pictures.

Friday, April 29, 2011

THE SCREAMING WILHELMS #6.1 (Reworked)

Okay, trying it again. The 1st version of this comic was unclear. I hope this one makes sense. If not I'll throw it on the scrap heap. That heap is getting out of control these days. Sorry trees, for all the paper I wasted.

If you want to see some more Screaming Wilhelms comics click HERE.
And HERE for one more.

Thursday, April 28, 2011

THE SCREAMING WILHELMS #6

Number six in a long run of six comics (so far) about the Screaming Wilhelms. See their earlier comics by clicking HERE.
Oh powerful and mighty flatulence joke, is there nothing you can't make greater?

UPDATE: This junky old version of the comic has been superseded by a NEWER FANCIER VERSION. CLICK!

Saturday, April 23, 2011

HORRIFYING FACE (and corpse story)

This is Franklin Pangborn. He was famous performer from back in the day. I've never heard of him until now. This photo is very disturbing to me. It's difficult to explain why it creeps me out so badly. I'm wondering if it's because the guy is all gussied like a corpse in a coffin.

If I stare at the eyes long enough they look like they twitch. At the small size it doesn't bother me as bad. Click and enlarge the image for the real horror. Stare at it for at least 30 seconds. Does it seem creepy to anyone else?

This reminds me of something that happened to me as a child. My mom brought me to a funeral home to visit an old lady who had just became a widow. We walked right up to the coffin and stood there next to the dead guy. As my mom talked to the widow, I stared intently at the dead guy. If you stare at something long enough it seem to move. Of course it was all in my head but for the life of me I honestly thought it was really breathing. I swear and cross my heart I saw what looked like the dead guy taking a deep breath. I screamed out, "He's breathing!!" and my mom slapped me down and told me to be quiet.

As I stared more intently at the chest and stomach of the dead body, it looked like it would periodically do it again and again. I thought the dead guy was trying to trick us and I was the only one who knew his secret. I figured my mom didn't hear what I said the first time because she didn't get upset about the trickery, so I yelled it again.

"HE'S BREATHING! HE'S BREATHING! HE'S TRYING TO TRICK US! HE'S NOT DEAD!"

When I said it louder the widow became excited and looked into the coffin at the body. I got promptly smacked and told to shut up by my mother. This was extremely frustrating. I felt like no one was doing anything about this deceit! Why was this faker trying to trick his wife into thinking he was dead? I figured everyone would be happy about my discovery, but they weren't. I got lots of glares and stares. I remember thinking, "What is wrong with these people?! Do they not want him to be alive?"

Sunday, April 17, 2011

NOTEBOOK DOODLE part-M

Sometimes it's difficult to decide which spot would be the best placement for ears. In those cases I like to use ALL the spots. Then no one will ever be able to say, "Hey! You don't understand human anatomy!"

Wednesday, April 13, 2011

SIR NECKLY LONGSWALLOW

I haven't drawn anything in a few days. Sometimes just a plain ol' ugly face satisfies the itch.

Tuesday, April 5, 2011

FREAKY GEEKS GUMBALL MACHINE JUNK

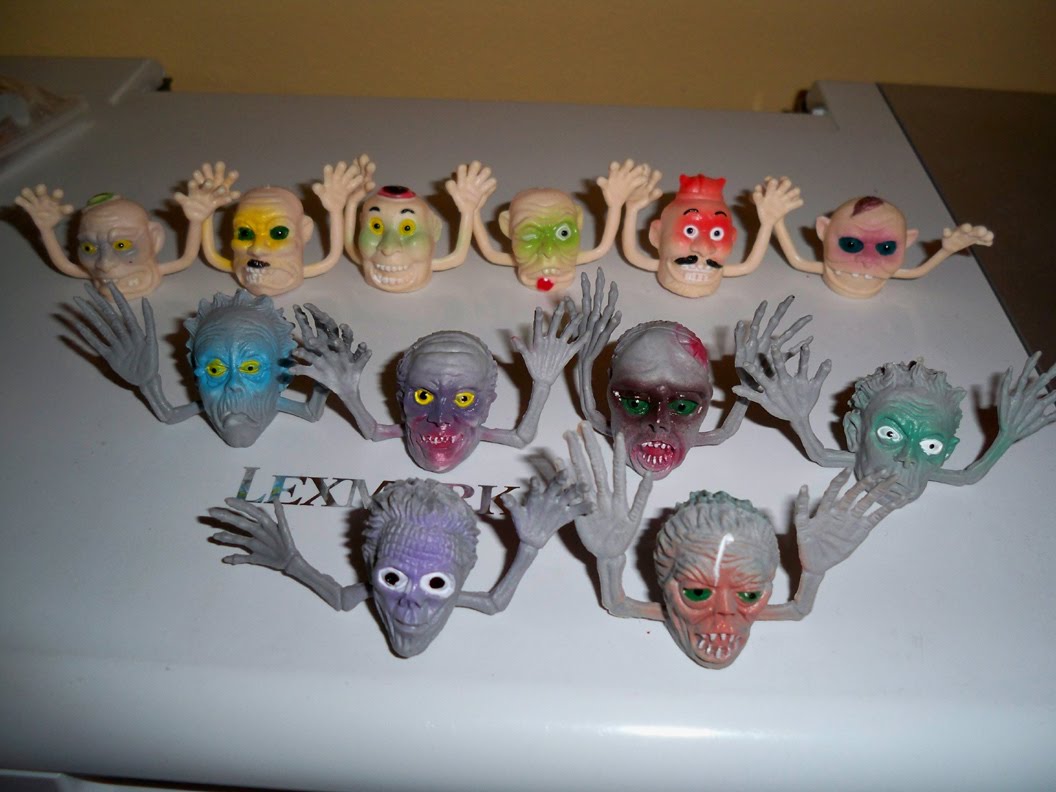
These are pretty nifty. They're called Freaky Geeks and you can get this full set for a 3 or 4 bucks right now on Ebay. They're about 1 inch tall so they meet my fit-unnoticeably-into-a-drawer requirement.

This is just the kind of thing to get me into a drawing mood. They all have names but I don't know them. I could google them to find out their names, but the google tab is ALLLLLLL the way over there on the other side of the screen, so forget that!

You can probably attain an entire set the old fashioned way, from a real gumball machine, but I bet you'd spend tens of dollars before getting the last one needed to complete a set.

Monday, April 4, 2011

FUZZ FACE

I just got a new toy. This is a Fuzz Face pedal for guitar, bass, keyboard and whatever else you can think to run through it. I like this thing a lot. It's pressure sensitive too. The stronger you strum a note, the more the fuzz is activated, so you have a lot of control over the sound of your sound. I wonder if it's a coincidence it's called Fuzz Face and it looks like a smiling face.

There are distortion pedals, overdrive pedals and fuzz pedals. A fuzz pedal has a sloppy sputter sound whereas the overdrives are more warm and solid, and distortions are cutting and sharp. Youtube explains it a lot better than I can.

FUZZ (You may want to skip ahead to 2:30)


OVERDRIVE


DISTORTION

Friday, April 1, 2011

I FOUND SOME FINGER PUPPETS

At the Hot Topic store in the mall they're selling weird little monster finger puppets. I found two different sets.

There's a zombie set, and a set of strange guys I can't quite figure out. They aren't exactly monsters but they aren't people either. Both sets oddly have six characters each, which is like selling a set of three shoes.
I really like finding little goofy things like this. They put me in the mood to doodle. Lately my home is getting pretty full of junk so I'm not able to get large items anymore. These things are so tiny they blend fairly unnoticeably into a drawer. Also since they aren't famous character products they're really cheap.
Related Posts with Thumbnails